

![]()
So many shows in the fall and so little time to attend them. That has been my lament the past few years and it has only grown louder this year. Many of you have seen our little “booth” at car shows years ago, we haven’t been able to set up over the last season or two because of work commitments. This year however, my place of employment opened up on Sundays and I was forced to work or lose my job (fired) if I didn’t. Well, besides the fact that that is pretty awful, it also precludes me from attending all the car shows after Church. Hopefully all of you have been taking advantage of your free time on the weekend to get to shows with your family and friends. Don’t miss out or take it for granted. When I go my boys (and my wife) always enjoy themselves and we get to spend time together as a family. (Anybody hiring out there?)
* * * * * * * * * * *
* * * * * * * * * * * * * * * * * * * * * *
On another note: we have been
trying for quite a while now to get someone to redesign the Long Island Classic
Cars.com website with no luck. Anyone know of someone capable, creative, and
interested? Please let us know. We want to make this the best automotive
website on the internet to serve the needs of the thousands of car enthusiasts
on Long Island!
* * * * * * * * * * * * * * * * * * * * * * * * * * * * * * * * *

And last
but not least… HAPPY HALLOWEEN!!
___________________________________________________
TABLE OF CONTENTS:
1
Editor’s Introduction
2 Picture Caption Contest
3 Cruise Night Information
4 Guest Writers’ Columns
Tom Sebastian
Bill Carberry
Justin Appelbaum
Rich’s Tech Tips
5
My Car Story
6
The Archive
7 Editor’s Closing
___________________________________________________
Long
Island Classic Cars’

Submit your entry along with your name and e-mail
address to: newsletter@liclassiccars.com
This contest is open to everyone! (LI Classic Cars.com
paid personnel, regular column writers, and business advertisers are not
eligible.)
Winners will be notified by e-mail and/or phone.
Please submit all entries by the end of the month.
No substitutions of prizes will be allowed.
In the event of prize choices, winner will be given
the opportunity to select the one they want.
All decisions are final and are made by the paid
personnel of Long Island Classic Cars.com
Winners must claim their prizes within 30 days of
contest end or forfeit the prize to the runner up.
If there are multiple correct entries on puzzle,
matching, fill-in, or Q&A contests - winner will be randomly selected from
all correct entries.
A few simple rules:
1) Be creative!
2) Answer by 10/31/09
No one
answered last issues Racing Trivia Contest correctly! What’s happening out
there folks?
Gotta
get that gray-matter working a bit harder my car people!!
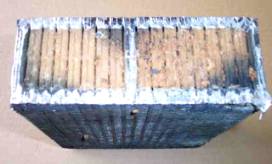
Here is
this month’s Picture Caption Contest photo…..

Go to it! Send in your wittiest comment by
10/31/09 and win the prize!
___________________________________________________
 “EXTRA EXTRA!
READ ALL ABOUT IT!!”
“EXTRA EXTRA!
READ ALL ABOUT IT!!”
The Cruise Nights are winding down for the season so get out there and enjoy them
while you can!
Check the EVENT listings on our website’s main page for full
information.

2009 Cruise Night location updates:
TUESDAYS: McDonald's. Metropolitan Ave. & 69th Road, Forest Hills, NY.
Sponsored by East Coast Car Association/Toys For Tots
TUESDAYS: Audrey Ave. Oyster Bay, NY
Sponsored by Oyster Bay Chamber of Commerce
TUESDAYS: Old Key Food Shopping Center. Dogwood Avenue. Franklin Square, NY
Public Gathering
TUESDAYS: Tri-County Flea Market. Hempstead Turnpike, Levittown, NY
Public Gathering
WEDNESDAYS: Nathan's Famous. 3131 Long Beach Rd, Oceanside, NY
Public Gathering
THURSDAYS: Wendy’s Shopping Center. Montauk Hwy and Locust Ave, Oakdale, NY
Sponsored by Still Cruisin’ Car Club
THURSDAYS: King Kullen Center. Corner of Manor-Riverhead Rd & Rt 25a. Wading River, NY
Public Gathering
THURSDAYS: Kings Park Plaza-Located on Indian Head Rd & Meadow Rd. Kings Park, NY New for ‘09
Sponsored by Kings Park Chamber of Commerce and Professor’s Diner
THURSDAYS: Villa Monaco’s Restaurant. 778 Montauk Hwy, West Islip, NY New for ‘09
Sponsored by the Long Island Road Gents
THURSDAYS: Bridge, Glen, & School Streets. Glen Cove, NY New for ‘09
Sponsored by the Glen Cove Fire Dept. and Glen Cove Downtown Business District
THURSDAYS: Atlantic Avenue between Merrick Rd and Sunrise Hwy. Lynbrook, NY New for ‘09
Sponsored by the Chamber of Commerce with funds benefiting the “Community Chest” soup kitchen.
FRIDAYS: Stop & Shop Center. Cypress
Hills St & Myrtle Ave. Glendale, NY
Sponsored by East Coast Car Association/Toys for Tots.
FRIDAYS: Bellmore Train Station. Sunrise Highway. Bellmore, NY
Public Gathering
FRIDAYS: Massapequa Train Station. Sunrise Highway. Massapequa, NY
Sponsored by the Massapequa Chamber of Commerce (Starts in summer for 7 weeks only)
SATURDAYS: *AM Cruise* Steve’s Collision. 618 North Bicycle Path. Port Jefferson Station, NY.
Sponsored by Steve’s Collision. (1st Sat. of month – check EVENTS section for dates)
SATURDAYS: Food & Fun Deli - Omni Hardware Lot. 1228 N. Wellwood Ave, West Babylon, NY
Sponsored by Long Island Mopars.
SATURDAYS:
WalMart/Home Depot Shopping Center, Crooked Hill Rd, Commack, NY
Public Gathering CLOSED DUE TO IDIOTIC BEHAVIOR ONCE AGAIN
SATURDAYS: Cedar
Beach, Ocean Parkway, Babylon, NY
Public Gathering (June - August)
SATURDAYS: Bob’s/McDonalds Shopping Center. Sunrise Highway, West Islip, NY New-replacement location for ‘09
Sponsored by the Long Island Road Gents
SUNDAYS: *AM Cruise* Ocean Pkwy, Captree Beach Parking Lot through May, then at OBI. Babylon, NY
Public Gathering
SUNDAYS: *AM Cruise* Bob’s/McDonalds Shopping Center. Sunrise Highway, West Islip, NY New for ‘09
Sponsored by the Long Island
Road Gents
If anyone knows of any cruise locations
that are fully up and running and not in danger of being cancelled
please let us know so we can post them for all to see – here, and in the EVENTS
section of the website. Minimum 50 cars attending.
We get e-mails from people telling us
about a “great cruise” that they know near their house! “You gotta check it out
man!” they tell us. Often they turn out to be half a dozen or so cars and the
spot breaks up after a month or two. ONLY tell us about viable ones please so
people don’t head out to places only to find nothing there. We understand
everything has to start small, and we appreciate that, but before we advertise
a location it needs to be a good one! This is for the benefit of all concerned.
Keep us posted! Thanks!
___________________________________________________
GUEST GHOULS’ COLUMNS

Tom Sebastian
went on a buying spree this past summer. Something tells me he didn’t
quite get what he wanted. Here he tells us about his three-car exchange program
that produced some interesting motoring. A very witty article as always from
Tom. Enjoy!!
Bill Carberry returns and instructs us on the proper technique
for reverse flushing your cooling system. Most people don’t do this properly or
completely, Bill walks you through it step by step and in detail. A long and
worthwhile article for sure!!
Justin Appelbaum from AutoMat describes what goes into giving new
life to an old Camaro in part one of his restoration tale.
A dedicated owner wanted
her car done right, so she is not cutting any corners! Justin takes us through
it.
Rich’s Tech Tips narrates
the tale of his recent engine rebuild and reminds us how important the details
and little things really are. Don’t skip out on anything to save a buck or two
when you want it done right and done to last!
In the My
Car Story section we have an
ultra-cool heavyweight truck! Drew Haagenson
is an enthusiast for military vehicles. What
he has resurrected here is awesome when you see it in person! A large barge
that carries our brave soldiers into the fray to defend our freedoms and help
right wrongs around the world. Thanks to Drew, one of these vehicles has been
restored to perfection and will provide a tribute to our men and women of the
services for decades to come.
Enjoy…
* * * * * * * * * * *
* * * * * * * * * * * * * * * * * * * * * *

Turbo Prop, Drop Top -- And
Surprisingly Hot (Well… Sort of…)
By Tom Sebastian
I am usually bored in summer… but rarely this bored: Three cars in one month! And every one of them a 1997!
Car #1 -- I don’t know what it is about the Scandinavians… I must have been one in a previous life. (And here I thought I was southern European.)

Anyway, because my first one, Saab 900, wasn’t as really as exciting as it looked or I was made to believe (-- the heavier convertible not being the best version with which to assess the brand --), I hadn’t yet given up the ghost of the thing. So, then, with time and some free cash on my side, I went in search of a reason to try out another. What are the differences are between the normally aspirated car and the turbo version? That question aside, I have never owned a car with a turbo. Well, then, reason enough! Off to the bank!
You get nothing much for having this car. You don’t even warrant a full, first look let alone a second. Yuppie neighbors will think you sensible, perhaps, for dumping the Porsche. If you are still working, your boss might trust you a bit more because of your sensible purchasing habits. And, if you’re young enough, he might even risk his daughter for a night… Anyone who buys a sedan from Saab for fun must be a dud.
But the old man would certainly be nonplussed if he is the one to get the first ride.
Trust me: the turbo combined with the Sport Option switch on the shifter will put you deep into that plush leather seat behind you. Under those conditions, all available horsepower mainlines straight to the tires. (Then there goes that date. No way he’s letting her go anywhere with the likes of you.)
It is so much faster than the convertible, you could almost overlook how comfortable the thing is. I haven’t seen this much leather or that many electrical gizmos since my M5.
Pregnant women seemed especially interested when I went to sell it. They can sense a safe machine in ways that one else can. (True enough: built like a tank.) The local politicians lined up as well for a possible second car. This must be for affect. Local voters would see their man in such a sensible vehicle and, therefore… how could they not vote him back in office? (Keep in mind, I live in farm country in summer and with no auto industry to speak of. In Michigan he would probably be stoned. But they would be guilty of two crimes: murder and stupidity. Saab is – or was at the time I had it – part of the late, great, General Motors Empire.)
The only complaint I heard from
another owner was that it was a bit like his gorgeous wife: sleek, comfy, smooth,
stylish, sexy and good in winter, BUT: has a high maintenance schedule,
expensive parts and repairs – and not the easiest to find mechanics for. (!! – What are the chances that that
relationship is still happening?!)
I would rate this one, if you are in the mood for a family-mover that is also a ‘mover’ of it’s own accord, a B+.
But if pregnant ladies and politicians like it… How good can it really be?
(Say what?? You want a true sports car plus the extra room and all the bells and whistles? Skip this one, then and go for a Mazda RX8.)
…..
Car #2 -- You see these things all over… It’s a clever, stylish and cheap way to be noticed, dry your hair, or give the dog/kids/spouse/significant whatever a windy thrill, all without too much worry about parts supply or heavy out of pocket expenses.

You can even imagine yourself playing Princess Grace or the Crown Prince of Monaco in it. As nice as it looks with the top down, can you really trust a V6 Chrysler to deliver anything memorable where the rubber hits the pavement? Does the great MOPAR history of this company have anything at all to do with this sleek, but meek apparition? While the answer to that last inquiry is a definitive, Nyet, you still have to give it its due: Old ladies take notice of you![1]
And, if not a great rider, it is, at least, a nice one. It is not hard to look at, either, and, with an adequate V6 to take you comfortably to highway speeds and beyond, I cannot dismiss this one easily. It is a fun, carefree, summer runabout. Compared with my earlier convertibles, the Saab 900 S and the humongous V12 Jaguar XJS, this one is far easier to live with. (And by far, the easiest convertible top to get up and get back down again.)
I am guessing that the Europeans would love this thing. Not to replace their beloved Beemers and Smart Cars, of course; I mean, I bet they would love to see us in this thing. It would confirm their view of us. They think we’re a bit silly -- lightweights sort of. A cowboy from Texas gets 8 years in the White House and a sleek Chrysler convertible filled with carefree Americans goes running about around wasting fuel, hair blowing in the wind, going nowhere in particular except, maybe, out for ice cream at the Dairy Queen… (But I think they envy us anyway. Except for the ice cream… theirs is MUCH better.[2]) Still, the car is easy on the eyes and does provide its owner with a bit of elegance on the cheap -- a Solara for a song.
This one rates a strong B rating as cheap eye candy, but only for the convertible. Restrain your competitive urges on the road and you’ll be fine.
…..
Car #3 – Best overall of the bunch. While the Saab turbo could send you into low orbit, this one was the better road machine. It actually provided a bit of fun and I never would have thought it: best sellers such as this are usually a tepid choice.

While it won’t win you any quarter mile races, it does not surprise me – after driving it – that the car has its own road racing series, the Jetta TDI Cup Race. With its supercharged diesel engines (the only single series using such an engine), those front-wheelers have so much torque that it could easily rip the front tires off the vehicle.[3] (As I always advise anyone in the market for any car: If the company doesn’t race it, don’t buy it.) And can you ever go wrong with a car from VW?
Thus, for surprise value: anther solid B+ rating here. I didn’t have the racing diesel engine in mine, and that one might have provoked me to click it up a notch to an A rating. But I doubt it. Even with a great engine, it just didn’t look like a great car. If anyone admires you driving a car this unimaginative, you must be misinterpreting ‘the look’. Chances are your wheels are on fire or something like that. Stop the car and check it out. A clean enough design, this one just doesn’t have the architecture to inspire. Handsome with a small ‘h’ is the best you can get here; bland as pancake batter next to an Aston-Martin or a classic Caddy.
“Reliable, solid and carefree transportation” is always and everywhere the advertising formula for suburban boredom. You don’t mind a trip in these things, but you don’t lust for it either.
These were all, basically, A to B conveyances. Not one of the above cars supplied the heady thrills nor the second, third and even fourth looks that the shortest jaunt in my Porsche 914 – one of the least potent of my previous cars -- provided.
That’s about it for me, I guess, as regards impulsive buying. Won’t do that again anytime soon. (Social Security income won’t allow it, anyway.) But at least the old ladies know who I am now!
NEXT TIME OUT: ONE DYING WISH!
(Tom, very funny and clever stuff! I can see those
old ladies eying you up as an afternoon buffet companion!) Pete
* * * * * * * * * * * * * * * * * * * * * * * * * * * * * * * * *

HOW TO PROPERLY REVERSE FLUSH A COOLING
SYSTEM
By Bill Carberry
Many people seem confused as to the best
way to flush out the cooling system in their classic car or truck. Most people
agree that reverse flushing is the best way to go about it but may not know how
to achieve a true reverse flush. Reverse flushing will tend to push out most
debris that builds up in coolant passages especially those of the radiator and
heater core. I will try to explain in the simplest terms how get the desired results.
The layout of components that I am using in this procedure will be consistent
with what will be found in most vintage V-8 engines and even most 4 & 6
cylinders.
Let’s start with how the antifreeze/coolant
mixture goes through your cooling system under normal operating conditions. The
easiest place to start and also to remember the flow pattern is that heat
rises. Hot fluid will leave the engine at the thermostat housing. On most
vintage vehicles this is the highest point on the engine except of course for
the carburetor. If you can’t tell the difference between a carburetor and a
thermostat housing please proceed to your nearest repair shop to have any and
all work done on your car by some one else. From the thermostat housing the
fluid goes through the upper radiator hose to the radiator. This may seem
rather simple and basic to most of you but please be patient while I go through
the motions anyway.
Once in the radiator the fluid gets cooled
off as it passes through the core portion of the radiator. This is the part
with the tubes and fins. Heat transfers from the fluid, to the tubes, to the
fins and the fins get cooled off by the air passing thru the radiator. After
being cooled off the fluid is then sucked back into the engine by the water
pump. It is at this point that a lot of people are not sure which way the fluid
flows. The water pump actually pushes the fluid through the engine block from
front to back. In fact there are many head gaskets that have small or no
coolant passages in the front of the gasket just for the purpose of forcing the
coolant to the rear of the block. Once at the back the fluid goes up to the
cylinder head(s) and starts to go back to the front of the engine through the
heads themselves. On a typical V-8 the fluid from both heads will then flow
together again in the front of the intake manifold and out the thermostat
housing to start the journey all over again.
A clogged heater core
 Since the fluid is at it’s hottest at the thermostat area this is also
the best place to tap into to the circuit for some much needed heat in the cold
winter months. Most manufacturers have the hose that feeds the heater core
start very close to the thermostat but not all do, so you may need to think and
search a little if yours is not the norm. And remember you can always go back
to the basic scientific law that heat rises. As the fluid goes to the heater
core it may or may not go through a heater control valve. This varies from car
maker to car maker and even model to model from the same car maker. Once the
fluid is in the heater core it actually acts as a miniature radiator and cools
off the fluid by transferring the heat from the fluid to the air that passes through
it. Only this time we want that heated up air to warm up our fingers &
toes. After the fluid has gone through the heater core and lost most of its
heat it gets sucked back to the engine through the heater return hose to the
water pump. Yes, just like the radiator gives up its coolant to the water pump,
so does the heater core. Again, this description applies to most common V-8
engines because I need to stick to something that most of you are familiar with
without getting into a description of how newer vehicles and cooling systems
are designed.
Since the fluid is at it’s hottest at the thermostat area this is also
the best place to tap into to the circuit for some much needed heat in the cold
winter months. Most manufacturers have the hose that feeds the heater core
start very close to the thermostat but not all do, so you may need to think and
search a little if yours is not the norm. And remember you can always go back
to the basic scientific law that heat rises. As the fluid goes to the heater
core it may or may not go through a heater control valve. This varies from car
maker to car maker and even model to model from the same car maker. Once the
fluid is in the heater core it actually acts as a miniature radiator and cools
off the fluid by transferring the heat from the fluid to the air that passes through
it. Only this time we want that heated up air to warm up our fingers &
toes. After the fluid has gone through the heater core and lost most of its
heat it gets sucked back to the engine through the heater return hose to the
water pump. Yes, just like the radiator gives up its coolant to the water pump,
so does the heater core. Again, this description applies to most common V-8
engines because I need to stick to something that most of you are familiar with
without getting into a description of how newer vehicles and cooling systems
are designed.
 Okay, now that we know how the normal flow of things goes we can do some
preventive maintenance on our pride and joy by throwing it in reverse. It would
be best to start this procedure when the engine is not hot so you don’t waste
time going to the emergency room with some serious burns. Draining the cooling
system of its existing coolant is the best place to start but not really
required. Of course you should drain it into a drain pan for proper disposal at
the end of your busy day. But do be sure that there is no pressure in the
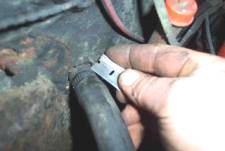
system. Now you should remove the heater return hose from either the water pump
or the heater outlet tube. You will want to go into either the hose or the
heater core so that you are forcing water to go backwards through the heater
core. If you choose to remove the hose from the heater core be sure to use
extreme caution so you don’t create the problem of a leaking heater core.
Slicing the hose and peeling it off the heater neck will usually assure no
heater core problems. In fact now might be a good time to replace the heater
hoses anyway.
Okay, now that we know how the normal flow of things goes we can do some
preventive maintenance on our pride and joy by throwing it in reverse. It would
be best to start this procedure when the engine is not hot so you don’t waste
time going to the emergency room with some serious burns. Draining the cooling
system of its existing coolant is the best place to start but not really
required. Of course you should drain it into a drain pan for proper disposal at
the end of your busy day. But do be sure that there is no pressure in the
system. Now you should remove the heater return hose from either the water pump
or the heater outlet tube. You will want to go into either the hose or the
heater core so that you are forcing water to go backwards through the heater
core. If you choose to remove the hose from the heater core be sure to use
extreme caution so you don’t create the problem of a leaking heater core.
Slicing the hose and peeling it off the heater neck will usually assure no
heater core problems. In fact now might be a good time to replace the heater
hoses anyway.
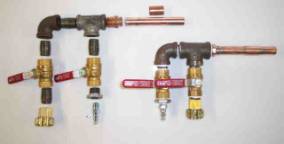
There are many “Reverse Flush Kits” for
sale in just about every auto parts store and most might work just fine. I use
a home-made flush gun that combines water and air pressure to force the fresh
water into the system and all the old stuff out. If you disconnected the hose
from the heater core you will need a scrap piece of hose to connect from the
flush gun to the heater core. If you took the heater return hose off at the
water pump just put the flush gun into the hose and clamp it with a hose clamp.
Now you need to block off the opening just created by your flush gun hook-up.
Any simple thing will work since it is only temporary. You can even stick an
old spark plug in the hose and clamp it if you have to.
 Now that you are ready to push all the old fluid out you need to give it
an exit. Let’s go through the system backwards and see where we end up. Through
the heater core (backwards), into the engine near the thermostat housing,
backwards through the cylinder head(s) and engine block to the water pump, out
the lower radiator hose and into the lower neck of the radiator. The fluid will
then go backwards through the radiator tubes and come out the top neck of the
radiator. This is where all the old stuff will come out. We have now gone
backwards through the heater core, engine and radiator. This is a true reverse
flush. Remove the upper radiator hose from either the upper neck of the radiator
or at the thermostat housing. If you choose to leave the hose connected to the
radiator you might want to rotate it so it points down into a drain pan to
catch the old stuff. As far as the other opening, you won’t need to do anything
as long as there is a thermostat in place and it is closed as it should be with
a cooled off engine. The closed thermostat will prevent your flushing procedure
from turning into a messy bath for you. If the thermostat is stuck open now
would be a good time to change that too. If you don’t use a thermostat for
whatever reason you will need to plug up the housing to prevent the
aforementioned bath.
Now that you are ready to push all the old fluid out you need to give it
an exit. Let’s go through the system backwards and see where we end up. Through
the heater core (backwards), into the engine near the thermostat housing,
backwards through the cylinder head(s) and engine block to the water pump, out
the lower radiator hose and into the lower neck of the radiator. The fluid will
then go backwards through the radiator tubes and come out the top neck of the
radiator. This is where all the old stuff will come out. We have now gone
backwards through the heater core, engine and radiator. This is a true reverse
flush. Remove the upper radiator hose from either the upper neck of the radiator
or at the thermostat housing. If you choose to leave the hose connected to the
radiator you might want to rotate it so it points down into a drain pan to
catch the old stuff. As far as the other opening, you won’t need to do anything
as long as there is a thermostat in place and it is closed as it should be with
a cooled off engine. The closed thermostat will prevent your flushing procedure
from turning into a messy bath for you. If the thermostat is stuck open now
would be a good time to change that too. If you don’t use a thermostat for
whatever reason you will need to plug up the housing to prevent the
aforementioned bath.
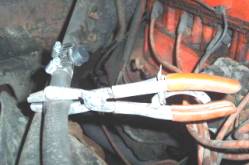
The final things to check before starting
the flush are that you put the radiator cap back on and the drain plug on the
radiator is closed. Another very important thing to check is that if your car
has a heater control valve it is now in the hot or open position. Failure to do
this can cause excessive pressure build-up in your heater core which may very
well cause it to leak. Very slowly open the valve on your source of fresh water
and make sure that you get fluid coming out of the top of the radiator. If you
don’t you either have a major blockage in the heater core, the heater valve is
closed or you have no water pressure in your hose. The
fluid will come out whatever color it originally started out at and will
gradually change to clear as all the old fluid is replaced with clean fresh
water. Assuming you have good flow out of your system you can now add just a
little bit of air pressure (if you are using a flush gun like I have shown). I
will repeat, just a LITTLE bit of air pressure. You only want to give it enough
air pressure to create some bubbling activity in the cooling system to help
loosen up any sediment or blockages. Once again I cannot stress the importance
of proper disposal of your old dirty coolant. Please check with your local
municipality for the acceptable methods in your area.
 Ok, now you have a cooling system that is free of all the old antifreeze
and hopefully all or most of the other undesirable sediments that have
accumulated over the years. Now you can disconnect your flush hose from the
engine but do not hook up the heater hose to the engine just yet. You also want
to drain out as much of the clean water from the system as possible so open the
radiator drain plug to drain the radiator all the way down. After the radiator
is empty and you have closed the drainplug (try not to forget this part) you
can start putting in fresh antifreeze. But wait, the heater hose is not hooked
up yet. No, I didn’t forget. If you leave the heater hose off the engine as you
pour in the fresh antifreeze you can eliminate most of the air pocket in the
engine to make for an easier and quicker warm-up. When you see liquid just start
to come up out of the open heater hose fitting, stop adding antifreeze and hook
up the heater hose. Now you can fill up the rest of the way with antifreeze.
Ok, now you have a cooling system that is free of all the old antifreeze
and hopefully all or most of the other undesirable sediments that have
accumulated over the years. Now you can disconnect your flush hose from the
engine but do not hook up the heater hose to the engine just yet. You also want
to drain out as much of the clean water from the system as possible so open the
radiator drain plug to drain the radiator all the way down. After the radiator
is empty and you have closed the drainplug (try not to forget this part) you
can start putting in fresh antifreeze. But wait, the heater hose is not hooked
up yet. No, I didn’t forget. If you leave the heater hose off the engine as you
pour in the fresh antifreeze you can eliminate most of the air pocket in the
engine to make for an easier and quicker warm-up. When you see liquid just start
to come up out of the open heater hose fitting, stop adding antifreeze and hook
up the heater hose. Now you can fill up the rest of the way with antifreeze.
A little information here about antifreeze
and the proper mix. Some people think that more is better, not so. Try to get
as close as possible to a 50/50 mix. If you are in a climate with severe cold
temperatures you can go as far as 65% antifreeze and 35% water. Any higher
percentage of antifreeze is a waste of money and actually detrimental to the
cooling system for at least two reasons. Reason #1; at extreme cold temps a
100% mix of antifreeze will actually start to jell up sooner than a proper mix.
Reason #2; pure antifreeze will not dissipate heat in hot weather as well as a
proper mix. Think of antifreeze like oil. You have many different types of oil,
right? What is the difference between gear oil and motor oil? Would you put
motor oil in your differential or gear oil in your engine? Straight antifreeze
would be too “thick” kind of like gear oil and will not transfer the heat out
of the system the same as a proper mix will. On the sample vehicle we flushed
the cooling system capacity as specified in the owners manual is 14 quarts.
This comes out to 3 ½ gallons. Putting in two gallons of undiluted antifreeze
will provide approximately a 60% antifreeze and 40% water mix.
OK, the radiator is filled almost to the
top, the heater hoses are hooked back up and the drainplug is closed, right?
Time to start up the engine. Right after start-up the level in the radiator may
drop down a bit. If so bring it back up to just below the filler neck and wait
for the thermostat to open up. Just prior to the thermostat opening the coolant
may rise & fall a bit and maybe even push out. Once the thermostat does
open the level will drop and you can top it off. Since the engine will be
warm/hot at this point you should fill the radiator right to the bottom edge of
the filler neck and put on the radiator cap. If your car has an overflow tank
you should fill that at least ½ way up so that as the engine cools it can draw
coolant from the tank. Most 1960’s and older cars do not have a separate tank
and should not be filled all the way to the top when cold. This lower level
allows room for the coolant to expand and pressurize as the engine warms up. If
you do fill one of these older cars all the way to the top when cold it will
only push out the overflow until it finds its own level.
You have just performed a true reverse flush of your cooling system.
Please remember that a cooling system flush is meant to prevent problems, not
fix them. If your cooling system has been neglected and the radiator or heater
core has become seriously clogged, a reverse flush probably will not solve your
problem. A complete system flush every two years should prevent build-up in the
system. Due to the many variations of different manufacturers cooling systems I
may not have given a precise set of directions for your particular vehicle but
these steps should apply to most classic cars & trucks
(Great read Bill. VERY
informative!) Pete
* * * * * * * * * * * * * * * * * * * * * * * * * * * * * * * * *

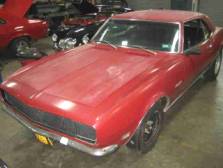
Resurrected Beauty
By Justin Appelbaum
Not every girl in high school is preoccupied with boys and
cheerleading. Not to say that Randi Haywood wasn’t, she was just more involved
with restoring the 1968 Camaro RS that was sitting in her garage. She attributed this love of cars to her
father, Pete Haywood, who had a tremendous influence on her, he had always been
heavily into working on cars and she was always there to lend a hand. In the 1970’s her father’s focus was
primarily on Corvettes, and she loved them, but she was partial to first
generation Camaros.
From an early age Randi knew that she was going to be
hooked on the car game. In fact she
began babysitting at the ripe old age of 11, to start saving her own money to
buy a Camaro for herself. She knew that she wanted a first generation
Camaro, which runs the three-year span from 1967-1969. Randi wanted a '68 for a few very specific
reasons; she didn't care for the side vent windows on the '67 or the squared
off wheel wells of the '69. It was the clean lines and coke bottle shape
of the '68 that really drew her in. To
this day the first generation Camaro still has some of the sexiest lines out
there.
Randi and her father searched Newsday every weekend looking
for the perfect Camaro. The search
lasted months and they drove all over Long Island, checking out at least fifty
Camaros, if not more! Both Randi and
her father went together, looking under the hood, checking out the chassis,
investigating for signs of rust and previous accidents. Not only was this fun for Randi and her
father, it was meant to be a learning experience as well. To really know what you are getting into
before you jump into a restoration project can save a lot of time, money and
heartache in long run. Finally after
what seemed like a lifetime to the duo, they saw their last Camaro. Randi broke
open that piggy bank bought this one to the tune of $1,100. It was 1980,
and she was 15 years old.
This particular ‘68 Camaro was chosen for several
reasons: The model designation was an
RS, and Randi was very fond of the look of the grill with the hidden
headlights. On top of that the car had never been in an accident, and had
very little rust. The interior of the
car was in excellent condition and did not need all that much work to get it to
the point where it would be comfortable to cruise around in. The only real negative aspects of the car
were that the motor needed some work, and the car was in desperate
need of a good paint job. All in all
the car had what Randi called “good bones.” To this day it still does.
Once the car made it back to their house, both Randi and
her father spent weekends in the garage working on the RS. Her father did most of the mechanical work,
while Randi was watching and learning while holding the drop light.
Much visual learning was also accompanied by wrench turning as well. The two never worked on the car without each
other there, this was a team project.
Once they began Randi quickly became addicted.
The initial restoration took over a year to perform. The engine was tweaked to get it running
again, the brakes were changed, the rust was taken care of and the RS received
a fresh paint job. The interior was
left alone with the exception of a new carpet that they had purchased from
AutoMat Co. in 1981, not knowing that that is where the car would end up over
twenty years later. All this work was
done by the pair in the workshop/garage at their house on Long Island. By
the time the car was ready to be driven, the timing could not have been better.
For Randi the time had come to get her driver's license!!
She drove the car through high school, and
made friends with many other car enthusiasts her age as well as older
folks - hanging out with car people, working on cars and racing them. Many of these folks from years ago she is
still friends with today.
A car bond like that is
hard to break.
Although Randi loved the car, one fine day in 1988 she
parked the Camaro in her garage, not realizing it would be the last time that
the car would be driven for decades.
Once college was over she needed something more practical, something she
could drive everyday and not have to worry about. Randi refused to sell the Camaro in order to buy another car, so
in the garage it sat. A glove compartment full of notes that people had
left on the car asking her to sell it, and leaving their number, but the answer
was always “nope, not happening!!” This
was not a car that was going anywhere.
Fast-forward 20 years, now it is Mrs. Randi Hoehl, three children,
and two minivans later, the time had come to resurrect the RS from its
slumber. Not knowing where to begin,
only knowing that she wanted to do a full frame-off restoration of her Camaro. After interviewing many other shops, a
friend recommended AutoMat Co. and she instantly knew she had found the right
shop.
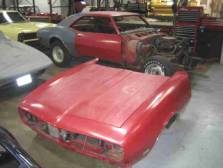
When the car arrived by flatbed it was a red dusty mess
that had not been started in 20 years.
So first things first: the entire interior was gutted down to the bare
metal, all the wiring, dash, gauges, heater controls were removed, and the
exterior trim and glass was pulled from the car. There were no issues with getting the car running, seeing that
all of the running gear, engine, transmission and rear end were going to be
replaced. Next it was sent out to the
media blaster to get all the old paint off the car and see what kind of rust
had accumulated over the years with the car sitting unprotected in the
garage. Once back at AutoMat Co.  the car seemed to be in very good shape with the exception of
some rust holes and some bondo that needed to be gone over again. Over all, the base platform was a great
starting point.
the car seemed to be in very good shape with the exception of
some rust holes and some bondo that needed to be gone over again. Over all, the base platform was a great
starting point.
Next issue we will
continue the build up of Randi’s 1968 Camaro RS, including a Chris Alston’s
Chassisworks Inc. sub-frame, Freddy Brown transmission, a Curry Enterprises
Ford 9” rear end, a custom built Chevy small block from Motive Engines on Long
Island and an original interior by AutoMat Co, of course. So stay tuned! ……
(Can’t wait to see how this one turns out Justin!) Pete
* * * * * * * * * * * * * * * * * * * * * * * * * * * * * * * * *

RICH’S TECH TIPS
By Rich Fiore
ANATOMY
OF AN ENGINE REBUILD
I have been putting
off my motor rebuild for a few years now and finally decided last fall to yank
the 440 and go to town. My Detroit “boat anchor” had been smoking
and leaking along with an oil light that would come on when she was good
and hot at idle. I had enough with putting it in neutral along
with cleaning the oil off of the rear bumper and finish panel.
 So the process began last fall. After hoisting the engine/trans combo with my
brother I finally started the teardown process in December. After taking a
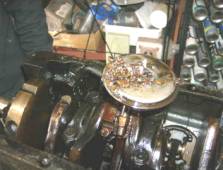
million " refresh my memory " photos along the way,
I finally removed the oil pan and found my reason for low oil
pressure. With the block inverted on the engine stand the screen on the
oil pickup could not be found... at all !!! The original nylon timing gears
exploded at one time and of course headed south to the oil pan and found
their way to the pick up screen. It is amazing how any oil could
have flowed through that mess ( see photo ) After completion of the
teardown, I enlisted the help of Master Builder John of JCS Automotive in
West Babylon to take a look before we send it out to S&K Speed for
machining. The reason I chose John for the build is academic. John ( like
myself ) is one I affectionately refer to as an anal bastard. .No details
are overlooked and no shortcuts are taken.... period! He gave it a quick check
and it was off to Kevin at S&K.
So the process began last fall. After hoisting the engine/trans combo with my
brother I finally started the teardown process in December. After taking a
million " refresh my memory " photos along the way,
I finally removed the oil pan and found my reason for low oil
pressure. With the block inverted on the engine stand the screen on the
oil pickup could not be found... at all !!! The original nylon timing gears
exploded at one time and of course headed south to the oil pan and found
their way to the pick up screen. It is amazing how any oil could
have flowed through that mess ( see photo ) After completion of the
teardown, I enlisted the help of Master Builder John of JCS Automotive in
West Babylon to take a look before we send it out to S&K Speed for
machining. The reason I chose John for the build is academic. John ( like
myself ) is one I affectionately refer to as an anal bastard. .No details
are overlooked and no shortcuts are taken.... period! He gave it a quick check
and it was off to Kevin at S&K.
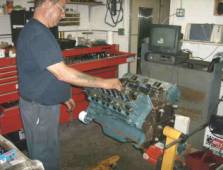
During machining I asked John if he
wanted to do the build at my place. Not comfortable with that, he stated lets
do it here since my tools are here and dirt would be blowing all over the place
when my garage door went up. I agreed. The block was completed rather quickly
and made its first trip back to my house for paint ( against Johns request
) but I'm anal when it comes to paint. ( I cant stand paint on my gaskets
). So block, heads, and all of the sheet metal stuff finally went off
to JCS ... painted and ready for the next step.
The first call I
received from John was that he didn't like the oil pan,push rods and
the windage tray. I went huh ???? The oil pan had some minor dents and
the windage tray and push rods had that " permanent dirt
" embedded in the metal. He banged out the dents and wire wheeled the
windage tray and push rods. Oye !!!! He also flattened out the
pan and timing cover sheet metal which was dimpled due to the previous
gorilla over tightening the hardware. He also let me know that he
would run a tap down each head bolt in the block to make certain we would get
no false torque readings. Great idea ( I would never have thunk of that one ).
Even though the block was boiled out at the machine shop this was not good
enough. John wanted to open up the oil galley plugs and brush
out all of the oil passages. He stated he found water in there. This may
have come from my over spray during the power - washing of the
cooling system ... oops. I got busted.
So
assembly started and I received a call. " We have a
problem". My first thought was “oh boy, a cracked block or
something.” After thirty five years you develop a feel for things.
He felt that the head bolts were stretching while using his
expensive Snap On torque wrench. He had another set handy and
one of those snapped. He had enough not knowing the history of this hardware
and told me to run to S&K and pick up a new set of head
bolts along with two new head gaskets. I could not agree more since now we know
the history and don't have to worry about a failure in service. I finally
brought him the second oil pan gasket ( 2 required with the windage tray ) and
he stated “get me a real gasket.” This one was made out of cork.... I ( don't
know what I was thinking ).
After assembly John did something that I would
have never thought to do: he spun the new oil pump and checked its output pressure
before starting the motor. My anal friend does not take for granted that a new
oil pump will work when the motor is started up. Veeeery sharp !!!! So final
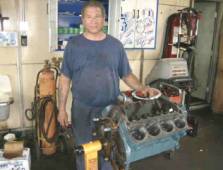
assembly was completed and I finally brought the 440 home. After
enough painstaking effort of installation with my car club Entertainment
Director Chris, we finally started it up. It fired up immediately which
brought a big smile to my face. It runs smooth with no leaks nor oil light
flicker and no more cleaning the rear panel.... Yeee Haa !!!!
A big thanks to John at JCS, S&K for the
great machine work and Chris for the many hours of making all of this happen.
Its top down for me till December !!!!!!
Quick and Dirty :
When was the last time you checked for leaks under that motor and tightened the
oil pan bolts?
(Hey Rich – a good reminder
about the little details that are important!) Pete
* * * * * * * * * * * * * * * * * * * * * * * * * * * * * * * * *


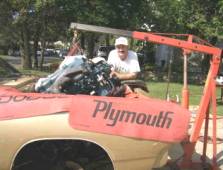
Drew W. Haagenson: 1971 AM General M35A2 Truck
Full name: 1971 AM General
Corporation Truck, Cargo: 2 ½ Ton, 6x6, M35A2 with Winch. Serial # 04L15171
In September 2008, I began to search for a military vehicle which I had always wanted. I found a listing for a military truck on eBay, and the seller was in NJ. I called him and he told me to come see what he had. There were about twenty trucks on his lot, all a little different, each with their own character. They were all deuces! Fresh off the auction block, from the Lakehurst NJ, Naval Air Station. The seller was a used car dealer that specialized in Military Vehicles. My truck was sitting there with new tires and interior seats, compliments of Uncle Sam. I would find out later that Uncle was kind enough to rebuild the motor, change the master cylinder, all the wheel cylinders & brakes, and replace the passenger door, battery box & tray, inboard air tank, and exhaust pipe. Wow!

“Duece & ½” the nickname it is known by because of its capacity to carry 2 ½ tons of equipment, materials and personnel cross country (that is, not on roads), was a series of military cargo/ troop transports that have been used since before World War II. They have participated in every campaign the US has been involved in. It is also still used by NATO forces around the world today.
This model, the M35A2 is equipped with a multi-fuel engine designed to burn gasoline, motor oil, diesel, jet fuel, and combinations of each. This particular motor is a 6 cylinder, turbo charged, 478 cubic inch, Continental Motors LDT 465-1C which produces around 134 bhp and 330 lbs-ft of torque. It has a divorced 2 speed transfer case with 10 forward gears, 5 high and 5 low; As well as 2 reverse gears. 1st and reverse gears are non-synchronized. There is also a power take off to operate the winch via the clutch.
The truck stands at nine feet high without the cargo cover, and has a ground clearance less than 13" below the axle. It originally had ten tube-type 9.00-20 non-directional tires but was modified by the military to operate with the rear axles singled and increased tire size to tube-type 11.00R20. The wheelbase is 178 inches with a total length of 278 inches and tracks at approximately 79 inches with an overall width of 96”. Without the spare tire, side racks and other basic issue equipment, the truck weighs 13,020 lbs.

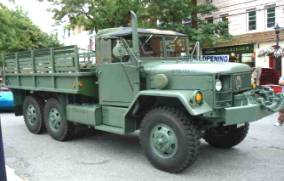
I learned that this particular truck
was rostered as Headquarters truck #41, and was assigned to the 42nd
Infantry Division, 1st Battalion (Mechanized) 114th
Infantry, NJ Army National Guard, Mount Holly, NJ. As it read on the bumper… 42
I 1 114 HQ41
Along with many other assignments, the truck was assigned to Alpha Company on a Tactical Vehicle Road March from 16 August 2003 to 30 August 2003. This information was recovered from documents inside the vehicle. It appears that it was in service as late as June 2005 based on a stencil found on the battery box.

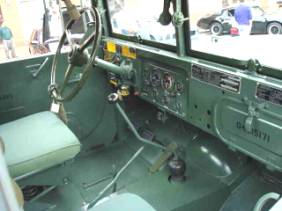
After I took delivery I began an extensive restoration which included rust repair, repainting, and replacement of some parts that would dress the truck up. The 8’x 12’ bed was rotted out from years of standing water and some kind of structure built onto it. It was replaced, along with the side racks (wood to fiberglass), the windshields, wipers & motors, driver’s door, tarpaulin cab top, and fuel tank. Most of the truck’s accessories run on air, and the vehicle is wired for 24 volts through the use of two 12 volt batteries in series. I also replaced the steering wheel, horns & buttons, batteries, alternator, radiator, and all the lights. The markers, tails, and blackout headlight are LEDs made by the current USGI contractor, Grote Industries.
The truck can be seen on display with the NY Military Vehicle Club, www.NYMVC.us at various functions around Long Island.
(Drew – this thing is
amazing! Thank you for resurrecting it and saving a piece of history!) Pete
______________________________________________________


Here is where
you can access previous editions of the Long Island Classic Cars Online Newsletter.
http://www.liclassiccars.com/Newsletter/
You can also access the previous Newsletters through a link on the main page of the website.
___________________________________________________
Enjoy the fall car season that we are in – take your car
out for a neighborhood trick or treat to the local auto parts store and get it
some “goodies”: New plugs, oil & filter, and the coolant for that radiator
flush!
Give it a good wax for winter protection too!

Pete Giordano
Editor
Long Island Classic Cars.com